Lesson 8: Attack Points, Collecting Features and Aiming Off
By Anthony Scott, 2020
Attack Points
An attack point is a large or obvious feature near the control that will be easy to find. A good attack point makes the navigation easier and faster, and reduces the risk of error. Once the attack point is reached, slower and more accurate navigation is used to locate the control.
In some instances, especially on easier courses, the best attack point might be the actual control location.
On more advanced courses, it might be useful to include 2 or more attack points. For instance, a large knoll that can be easily spotted from a distance, might be used as an initial attack point. A second attack point closer to the control, such as a cliff on the side of the knoll, might then be used for the final approach.
If there is no obvious attack point, it is a warning that extra care must be taken when navigating to the control.
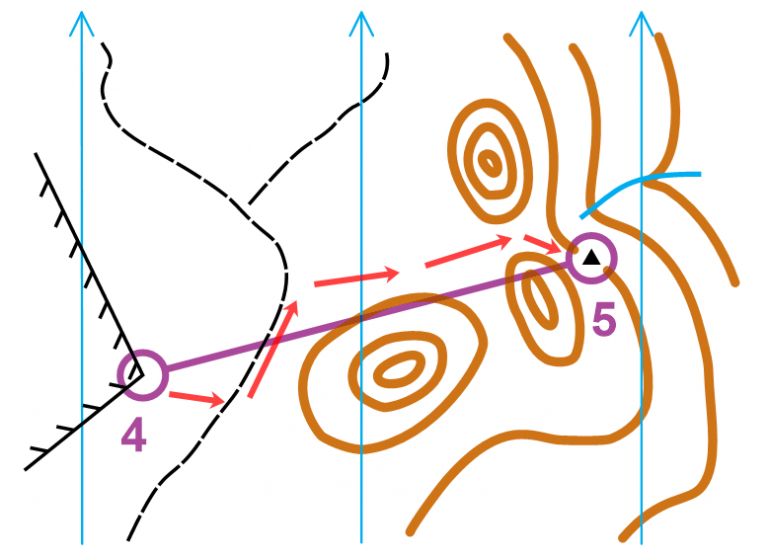
“Leaving control 4, my plan is to head west to the track, then run to the bend. Using my compass to maintain direction and reading the contours, I will navigate past the large knoll on my right and head towards the saddle. This is my attack point. I will now navigate carefully, contouring around to the right, keeping the gully in sight on my left, until I see a boulder cluster (control 5)."
Collecting Features
A collecting feature is a prominent feature on route that is unlikely to be missed, and helps simplify navigation. It is most commonly a linear feature such as a track, fence or watercourse. Alternatively, it might be a prominent feature beyond the control that prevents you from over-running the control. In this case, it is often called a ‘catching feature’. Collecting features allow faster and safer navigation. However, you should never run ‘blindly’ towards a collecting feature. If the collecting feature is less distinct than expected (overgrown track or broken fence line) it is possible to miss it. Alternatively, if you accidently deviate off line, a different track or fence might be reached. This could cause a parallel error. By cross-checking compass direction and identifying the terrain and other prominent features along the way, you will know when you are coming close to the collecting feature, and are much less likely to miss it or deviate off line.
I exit control 1 heading slightly uphill and cross a path before reaching the fence line. This is my collecting feature. I then run past the slight bend in the fence and cross over at the fence intersection. Using the fence as a collecting feature has made the navigation safe and easy (green light). I now contour past some boulders towards the ridge line and run under a cliff line. This is my attack point. Slowing down and scanning the forest, I continue contouring around the other side of the ridge until I see a rock surface with a cliff below it. This is control 2.
Aiming Off
This is a technique used when heading towards a control that is on, or near, a catching feature that is at right angles to the direction of travel. If you aim directly towards the control, and you accidently deviate slightly, you will hit the catching feature, but won’t know which side of the control you are. By deliberately aiming off to one side you will know which way to turn when you hit the catching feature. For instance, if you aim directly for a termite mound next to a watercourse, but you don’t see it when you hit the watercourse, you won’t know which way to turn. However, if you deliberately aim a little downstream of the termite mound, you can be more confident that you will need to turn upstream to look for it.
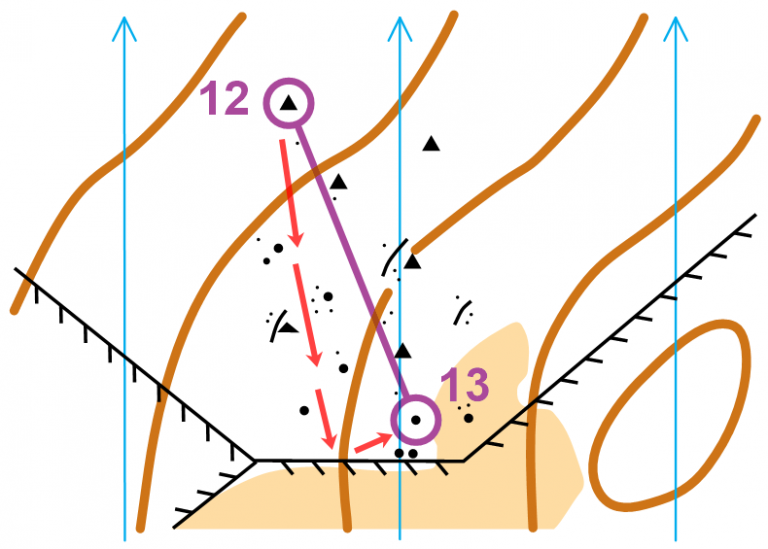
“From 12 to13, I can navigate carefully up the hill, cross-checking all of the rock detail along the way. This will be slow and tedious. Alternatively, I can aim slightly to the right and use the fence line behind the control as a catching feature. When I reach the fence I turn left and use the two boulders next to the fence (and directly behind the control) as an attack point.”