Introduction to Orienteering
Lesson 2: Map Orientation
To make it easier to relate the map to the ground, the map should be turned around so that it always faces the same way as the ground it represents. This is called orientating your map.
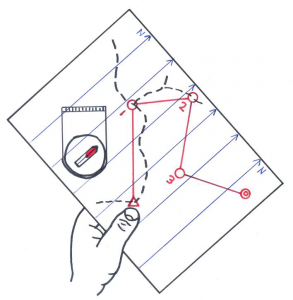
Place the compass on the map. Turn the map until the magnetic north needle in the compass lines up with the magnetic north lines on the map; it is now facing the same way as the ground.
In the example below, the map has been orientated to north, and hence all of the mapped features are aligned to the corresponding feature in the forest. The map indicates that the track heading from the start to the first control is straight ahead.
When navigating, the map should remain oriented to north all the time.
How often should you check that the map is oriented? Every time you look at their map! And every time a change of direction is made, or a new linear feature (such as a track or fence) is crossed.
If you are running along a linear feature, such as a spur or watercourse, orientate your map and check that it lies in the same direction as shown on the map. If not, STOP and check your map carefully. If the features marked on the map don’t match the terrain, something is wrong. Early recognition of an error will save a lot of time and energy.
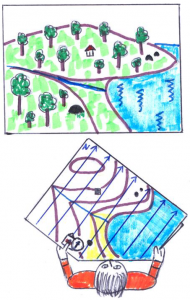
In the next diagram, a competitor has orientated the map with north, and the features on the map align with those seen in the forest. The map shows a lake on the right hand side, and a hill straight ahead. In front of the hill, a watercourse runs into the lake. The map also shows a small hut straight ahead, halfway up the hill, and two boulders near the edge of the lake. Another boulder is directly ahead, and very close by.
In summary, use the compass to orientate your map to magnetic north. The features on the map are now aligned with those in the forest. This makes navigation easy. Every time you look at the map, the first thing to do is check that it is still oriented to north.