NOTE: The content here is for those who are ready to build their skills and are seeking guidance. You do not need to know any of this in order to show up at and enjoy an orienteering event! That’s right, you can just show up, get a crash course from a newcomer instructor, and have a ton of fun. We also recommend you read the Getting Started guide first. That said, if you’re ready to build some skills, read on.
The most important skill in Orienteering is orienting the map!
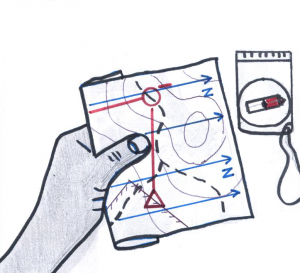
Maps are not supposed to be held with the top up the top, but instead in the same orientation as the terrain around you. Look for a prominent feature around you like a fence or a road, and rotate the map to match.
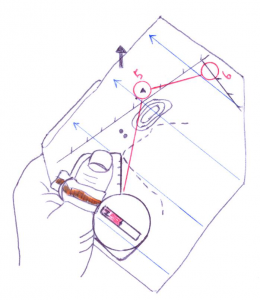
You can also use a compass to assist, but it’s more important to learn how to orient your map using the terrain. A compass comes in handy when you’re on more difficult courses and the terrain is complicated.
Knowing where you are on the map is critical. Once you’ve figured that out, place your thumb or the tip of the compass where you are and track your position as you move along.
Now, whenever you glance at your map you know where you are and can easily figure out where to go. If you get confused, you will at least know you’re somewhere near your thumb, and it’ll be easier to re-locate.
Thumbing the map is an important core skill and the foundation for more advanced compass skills.
When you’re starting out, Line Features are the best way to navigate from one control to the next. Line features are anything that runs in a line, as opposed to a point feature. Some examples of line features:
- Tracks/Roads
- Fences
- Power Lines
- Watercourses
On the Very Easy courses, all controls are on Line Features, and you can always get from one control to the next by following a line feature.
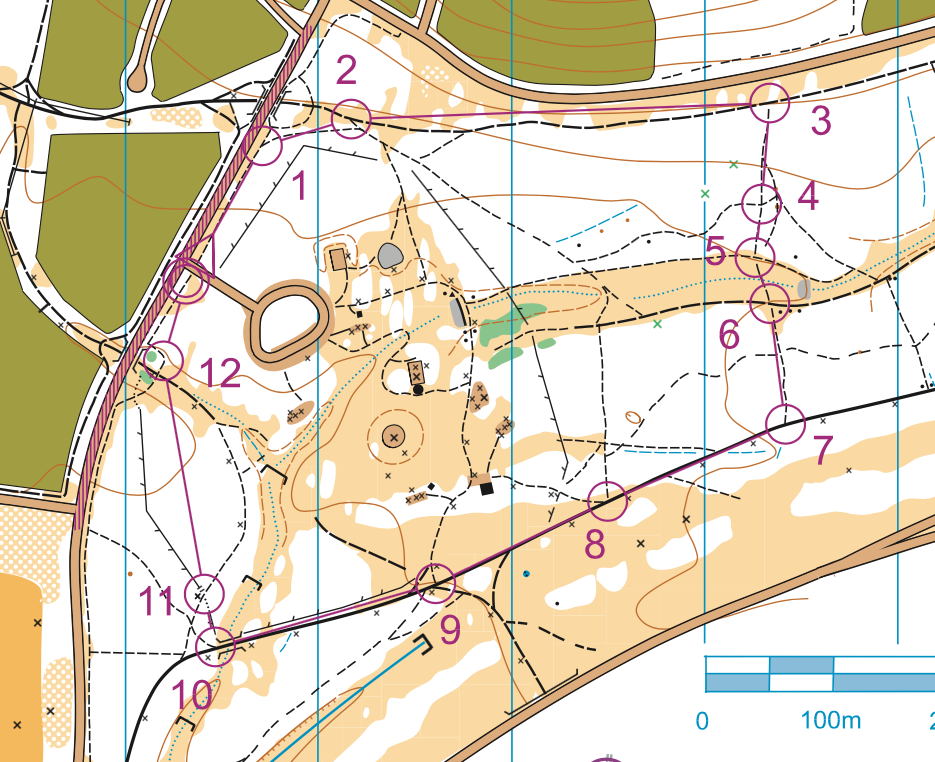
On an Easy course, controls are either on a Line Feature, or close by. You can usually follow one or two line features to get to the next control, but sometimes you can take a shortcut through the bush. See leg 2 to 3 below.
Don’t confuse contours with line features. Although contours are shown on the map as lines, you can’t see them in the terrain, and therefore can’t follow them.
There are some more advanced line features, but these are rarely, if ever, used on Very Easy or Easy courses, for example:
- Point features in a row, like rocks or termite mounds
- Sometimes different vegetation forms a line in the terrain
- A ridge or spur
As you graduate to harder courses, you’ll be following line features less and less. Moderate courses will rarely allow you to use line features between controls, but there should be a catching feature beyond controls that are on point features. Catching features are often line features, such as a fence or a road, so that if you miss the control then you will certainly not miss the catching feature. You can then turn around and go back to search for the control.
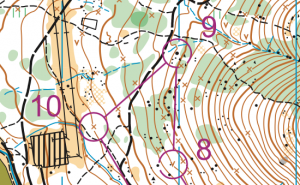
Orienteering maps are specially made for orienteering, and show an incredible amount of detail. On an orienteering map, you can see features such as a small bends in the trail, hills only 5 meters tall, and even individual boulders that are just half a meter tall.
The reason orienteering maps can show so much detail is due to their large scale. A map scale indicates how “zoomed in” or “zoomed out” it is. For instance, a bushwalking ( topographical) map is typically zoomed way out (small scale) so that a centimeter on the map is almost a kilometer on the ground, whereas an orienteering map is zoomed way in (large scale).
For example on a 1: 10,000 scale map 1 cm on the map represents 10,000 cm (or 100m) on the ground.
At your first orienteering event, be prepared for features to appear much sooner than you anticipated; it can take awhile to get adjusted to such a large map scale!
The common map scales we use are:
1:2,000 to 1:5,000 : School maps, Sprint maps
1:5,000, 1:7,500, 1:10,000 : Bush maps (sprint and middle distance events)
1:10,000, 1:15,000 : Bush maps (middle and long distance events)
Another reason that orienteering maps can show an incredible amount of detail is due to small contour intervals.
Contours are the brown (and often squiggly) lines on a map that connect points of equal elevation. In other words, contour lines describe the shape, or topography, of the land.
On a hiking map, the difference in height between one contour line to the next is often 25 metres. On an orienteering map, the difference is typically just 5 metres, and sometimes less. Imagine all of the detail that could be lost in 25 metres: hills, cliffs, small ridges, and more. On an orienteering map, these small features are mapped!
At your first orienteering event, be on the lookout for much smaller features than you might expect.
Colours are very important for orienteering maps, however, they are pretty easy to learn because they are reasonably intuitive.
Brown : features to do with topography. Contours, pits, depressions, knolls, termite mounds
Blue : water features. Creeks, rivers, dams, marshes
Black : Rocks features (boulders, cliffs, rocky ground) and man made features (tracks, roads, building, fences, powerlines)
White : runnable forest. Take note!
Yellow/Orange : grass, open land
Green : various shades – slow forest to impenetrable (blackberry bushes!)
Olive Green : out of bounds (eg. houses, garden beds, sensitive vegetation, etc)
Purple Stripes : temporarily out of bounds (revegetation, building site, etc)
Many of the colours are designed to show how passable the terrain is. This is important for the orienteer, so they can choose the best route choice.
As noted above, white designates runnable forest, whereas yellow/orange is open land. Don’t confuse the two!
Here’s a handy chart that shows photos of terrain matched with a map: Terrain vs Map PDF
Orienteering maps use a range of symbols to represent the real world objects.
Here are the most important ones:
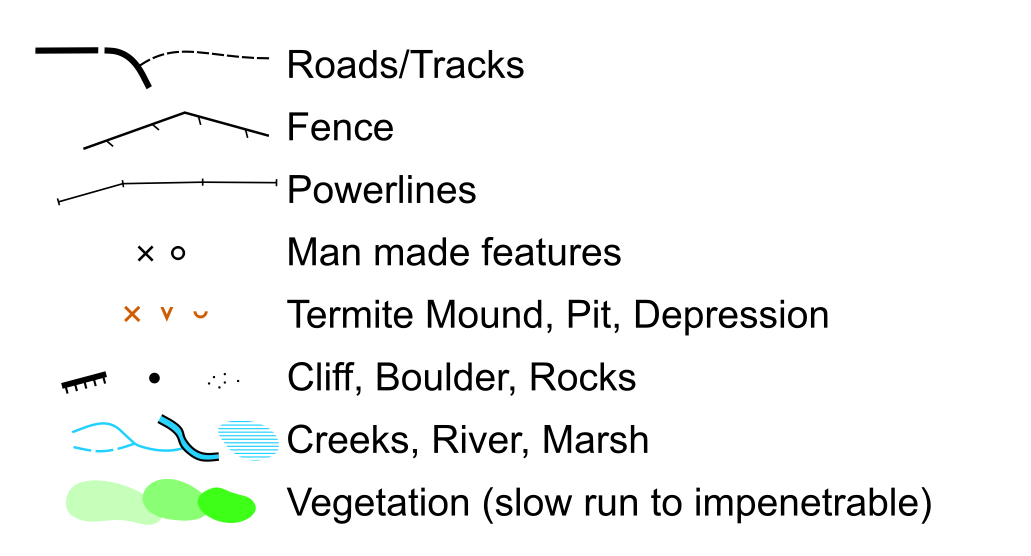
Note that Man Made Features (the black X or O) can represent a wide range of objects. To the orienteer, all you need to know is that you’re looking for some kind of man made feature. It could be a car wreck, park bench, pile of rubbish or a prominent sign.
You don’t need to learn all the symbols at once. You’ll start picking things up as you do more courses and see more maps.
For a full list of map symbols you can download the Map Symbols PDF: Australian Map Symbols (April 2014)
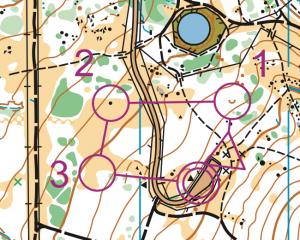 An orienteering course is marked on a map with purple (or magenta) shapes and lines. The start is a triangle, the controls are in the exact center of circles (which are also numbered), and the finish is two concentric circles.
In a Line event (most regular events – example right), participants must complete the course in a prescribed order by visiting control number 1, then 2, then 3, and so on. In this case, control circles are connected by lines to help you see where to go to next. You do not need to travel on the line; you choose your own route.
In a Score event, participants can find controls in any order, and the goal is to find all the controls as quickly as possible.
A Scatter course is where participants needs to visit as many controls as they can within a time limit (in any order). All Street Series events are scatter courses.
Both score and scatter courses uses the same symbols as a line event, except that there are no lines connecting control circles.
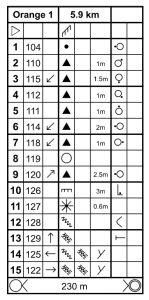 Control descriptions may look like hieroglyphics, but they’re an international standard. So once you learn how to read control descriptions, you can read them anywhere in the world!
Control descriptions have eight available columns of information for each control, which is a lot! But don’t worry about memorizing them all, because the first two columns have the most essential information, and are also the easiest to learn.
The first two columns show numbers. The first column denotes what order you must find the controls in (if required), and the very important second column denotes the number that you will find on the actual control. So if you see “2, 110” that is the second control you must find and you will see the number 110 on the control when you find it. If the number in the second column does not match the control you’ve found, then you’ve found a control that is on another course! (Sorry, there are no bonus points for finding extra controls.)
The next most useful column is the seventh column. This column tells you what side or area of a feature the control is on. So if the control is on a boulder, this column will tell you which side of the boulder the control is on (north side, north western side, western side, and so on). These symbols are the most intuitive to learn, as well as the most helpful to know.
The other columns take more time to learn, but also don’t show you much information that the map doesn’t show you already. Fortunately, the columns that are the most challenging to learn, are the least essential ones!
Learning control description symbols may feel intimidating, but don’t let that stop you from orienteering. You can have fun and complete an orienteering course by reading just the first two columns, the easiest columns to learn! You can learn the other columns over time.
Luckily for beginners, both the Very Easy and Easy courses often also include English control descriptions.
For a one page summary of symbols used in Australia, see OA Control Descriptions (Feb 2018)
For an exhaustive explanation from IOF (International Orienteering Federation), see IOF Control Descriptions
Advanced Skills
If you’ve mastered all of the basic skills, then it’s time to move on to Advanced Skills.
